
Postgres provides three fundamentally different approaches for backing up its data:
- SQL dump (or Logical)
- File system-level backup (or Physical)
- Continuous archiving (or Point In Time Recovery)
![]() This article describes how to backup PostgreSQL databases in Windows. If you need to backup PostgreSQL databases in Linux, then we recommend that you have a look at this article: How to Automate PostgreSQL Database Backups in Linux.
This article describes how to backup PostgreSQL databases in Windows. If you need to backup PostgreSQL databases in Linux, then we recommend that you have a look at this article: How to Automate PostgreSQL Database Backups in Linux.
Now let’s discuss these three methods one by one but if you prefer GUI tools you can use our free application to create database backups, which is, in essence, a powerful wrapper for pg_dump that creates SQL dumps.
How to create PostgreSQL dump file
In Postgres, to extract a database into a script file or other archive file, a utility called “pg_dump” is used. A crucial advantage of this utility is that you can restore its dumps on newer versions of PostgreSQL or on machines with different architectures. Other backup methods, like file-level backups and continuous archiving, are bound to a particular server version and architecture.
The simplest usage of this command is:
pg_dump database_name > database.sql
or:
pg_dump database_name -f database.sql
This command creates an SQL file containing commands necessary for recreating the database in the same state it was at the time of the backup.
If you got “pg_dump” is not recognized as an internal or external command” error add the path to PostgreSQL’s bin directory to the PATH environment variable (in my case it is “C:\Program Files\PostgreSQL\11\bin”). The option for changing the environment variable is running the command with the full path, for example:
“C:\Program Files\PostgreSQL\11\bin\pg_dump” database_name > database.sql
The command must be run by a user with privileges to read all of the database information. If your Windows user doesn’t have enough rights to your database then you can run this command from Postgres user:
pg_dump -U postgres database_name > database.sql
Running pg_dump in batch (unattended)
If you plan to back up a database automatically, then you might need to get rid of a password prompt. It will be useful if you run a backup in a batch or scripts where no user is present to enter a password. You can do it by assigning a password to the PGPASSWORD variable:
SET PGPASSWORD=my_password
pg_dump -U postgres database_name > database.sql
As an alternative, when you don’t want to keep the password in a batch file, you can put the credentials to %APPDATA%\postgresql\pgpass.conf in the following format:
hostname:port:database:username:password
Asterisks can replace the hostname and database.
The following commands will create a directory and add the record into the file in one batch:
cd %appdata%
mkdir postgresql
cd postgresql
echo localhost:5432:my_database:postgres:my_password >> pgpass.conf
Backing up a remote server
If you need to back up a remote server add -h and -p options:
pg_dump -h host_name -p port_number database_name > database.sql
If your database schema contains OIDs (like foreign keys), you must make pg_dump dumping the OIDs as well using the -o option. If your application does not reference the OID columns in any way, this option should not be used.
Backing up a single table
To dump a single table, use the -t option:
pg_dump -t table_name database_name > table.sql
In this case, pg_dump will not dump any other database objects linked to the selected table. It means that there is no guarantee that you will be able to restore this dump on a clean database without errors.
In old (before 8.2) PostgreSQL versions, -t table_name would dump all tables with the specified name. Modern Postgres engines dump everything visible in your default search path. If you want to go back to the old behavior, you can write -t “*.table_name”.
Also, you must write something like -t schema_name.table_name to choose a table of a particular schema instead of the old options like -n schema_name -t table_name.
Compressing the backup script
If you need to compress the output file, you must use the -Z option:
pg_dump -Z6 database_name > database.gz
This command causes the entire output file to be compressed as though it had been fed through gzip with a compression level equal to 6 (it can vary from 0 to 6).
Another option to get a smaller backup file is by using the custom file format on backup.
How to restore the PostgreSQL dump file
Since the text files generated by pg_dump contain a set of SQL commands, they can be fed to the psql utility. The database itself will not be created by psql, so you must create it yourself from template0 first. So, the general command form to restore a dump is:
createdb -T template0 database_name
psql database_name < database.sql
Before starting to restore an SQL dump and the recreation of the objects with the original ownership and/or permissions, it is crucial to make sure that all users who have been granted permissions on objects, or who own objects in the uploaded database, already exist. Otherwise, the restoration process will fail.
Restoring a remote database
If you need to restore a database on a remote server, you can connect psql to it using -h and -p options:
psql -h host_name -p port_number database_name < database.sql
It is possible to dump a database directly from one server to another due to the ability of pg_dump and psql to write to or read from pipes, for example:
pg_dump -h source_host database_name | psql -h destination_host database_name
This command will duplicate a database:
createdb -T template0 new_database
pg_dump existing_database | psql new_database
Error handling
If an SQL error occurs, the psql script continues to be executed; this is by default. Such behavior can be changed by running psql with the ON_ERROR_STOP variable, and if an SQL error is encountered, psql exit with an exit status of 3.
psql --set ON_ERROR_STOP=on database_name < database.sql
If an error happens, you receive a partially restored database. To avoid this and complete the restoration, either fully successful or fully rolled back, set to restore a whole dump as a single transaction. To do it, use -1 option to psql:
psql --set ON_ERROR_STOP=on -1 database_name < database.sql
How to backup several PostgreSQL databases at once
Pg_dump can dump only one database at a time, and information about tablespaces or roles will not be included in that dump. It happens because those aren’t per-database but cluster-wide. There is a pg_dumpall program that supports convenient dumping of the entire contents of a database cluster. It preserves role and tablespace definitions (cluster-wide data) and performs backups of each database in a given cluster. pg_dumpall works in the following way: it emits commands to re-CREATE TABLE IF NOT EXISTSspaces, empty databases, and roles and then invokes pg_dump for each database. Although each database will be internally consistent, snapshots of different databases may not be fully synchronized.
The basic usage of this command is as follows:
pg_dumpall > all_databases.sql
Psql and option -f can be used to restore the resulting dump:
psql -f all_databases.sql postgres
No matter which database you are connecting to, the script file created via pg_dumpall will contain all necessary commands for creation and connection to the saved databases.
How to backup PostgreSQL to a custom-format archive file
While the plain text format produced by pg_dump is natural and simple, at the same time, it is not very flexible because it can create huge output files. Alternatively, PostgreSQL has a nice little feature that allows users to export the so-called “custom format”, a format that is archived by default (without additional steps) and provides significant flexibility, especially when re-importing.
To produce a backup file in custom dump format, you need to add the -Fc option:
pg_dump -Fc database_name > database.dump
This file format must be used with pg_restore to rebuild the database. That allows pg_restore to be selective about what is being restored, or even to reorder items before restoration. Archived file formats are intended for transfer between architectures.
To restore the custom file format, use the following command:
pg_restore -d database_name database.dump
Using the -j option, you can dramatically reduce the time to restore a large database to a server running on a multiprocessor machine. This is achieved by running the most time-consuming parts of pg_restore, namely, those that load data, create constraints, or create indices using multiple simultaneous tasks. Each job represents one thread or one process; it uses a separate connection to the server and depends on the operating system. For example, this command will restore a database in four concurrent jobs:
pg_restore -j 4 -d database_name database.dump
Use the following to drop the database and recreate it from the dump:
dropdb database_name
pg_restore -C -d database_name database.dump
With the -C option, data is always restored to the database name that appears in the dump file.
Run the following to reload the dump into a new database:
createdb -T template0 database_name
pg_restore -d database_name database.dump
Other PostgreSQL backup formats
The pg_dump provides two other output file formats: directory and tar. Both of them are restored with pg_restore utility.
To create a directory-format archive, you need to use the -Fd option:
pg_dump -Fd database_name -f database.dump
A directory with one file for each table and dumped blob will be created, as well as a so-called Table of Contents file that describes the dumped objects in a machine-readable format that pg_restore can read. Standard Unix tools can be used to manage a directory format archive; for example, the gzip tool can be used to compress files in an uncompressed archive. That format supports parallel dumps, compressed by default.
The tar format is compatible with the directory format: a valid archive in directory format is produced when a tar-format archive is extracting. However, the tar format does not support compression. In addition, when using the tar format, the relative order of the table data elements cannot be changed during the restoration process.
To create a tar file, use the -Ft option:
pg_dump -Ft database_name -f database.tar
How to backup database object definitions
From time to time, there is a need to backup only the database object definitions, which allows you to restore the schema only. It can be useful in the test phase, in which you do not want to keep the old test data populated.
Use the following command to backup all objects in all databases, including roles, databases, tablespaces, tables, schemas, indexes, functions, triggers, constraints, privileges, views, and ownerships:
pg_dumpall --schema-only > definitions.sql
Use the following command to backup the role definition only:
pg_dumpall --roles-only > roles.sql
Use the following command to backup the tablespaces definition:
pg_dumpall --tablespaces-only > tablespaces.sql
File System Level backup
An alternative backup strategy is to directly copy the files that PostgreSQL uses to store the data in the database. Any method for file system backups can be used, for example:
xcopy “C:\Program Files\PostgreSQL\11\data” “D:\backup” /E
Then, you will be able to start a new server instance with the same release name on this folder (note that you have to run this command at the administrator level):
pg_ctl start -D “D:\backup”
This method gives you the following advantages:
- Faster than logical backups (SQL dump), as fast as simple file copying
- Entire instance (cluster) backed up
- Does not cause lock contention and does not depend on other connections releasing their locks
- Almost instant recovery process — no need to execute SQL statements to get data back
and at the same time, it implies some limitations:
- Requires the database to be shut down
- Can be restored only on the same major version of PostgreSQL
- Single databases or single tables cannot be restored: one has to restore all or nothing
- Produces very large backups as it includes all the indices and bloat and may, therefore, be much, much larger than SQL dumps
Continuous archiving
The continuous archiving method combines a file-system-level backup with a backup of the WAL files (that stores each change made to the data files of the database). This way is more difficult to administer than any of the previous approaches, but it has some significant advantages:
- There is no need to have a perfectly consistent file system backup as a starting point. A log replay will correct any internal discrepancy in the backup (this does not have a crucial difference from what happens during failure recovery). Thus, you do not need to create a snapshot of the file system, just tar or a similar archiving tool.
- Continuous backups can be achieved by simply continuing to archive the WAL files. This is especially valuable for large databases, where it is not always convenient to perform a full backup.
- There is no need to replay the WAL entries all the way to the end. You could stop the replay at any point and have a consistent snapshot of the existing database. Thus, this technique supports the so-called “point-in-time recovery”: the database can be restored to its state at any time since the database backup was made.
- If you continuously feed the series of WAL files to another machine that has been loaded with the same base backup file, you will have a warm standby system: the second machine can be brought up anytime, with the nearly-current copy of the database.
As with a simple file-system-backup method, this technique can only support restoring an entire database cluster, but not a subset. In addition, this requires large archive storage: a basic backup can be bulky, and a busy system will generate many megabytes of WAL traffic that needs to be archived. However, this is the preferred backup method in many situations where high reliability is required.
We will not cover all the processes of setting up continuous archiving, as it’s exhaustively described in the documentation.
How to backup PostgreSQL database using SQLBackupAndFTP
If you prefer the GUI interface for managing your backups then you can try our free utility called SQLBackupAndFTP. Using pg_dump internally it adds more usability and a bunch of other useful features like:
- running backup to a schedule
- notifying you if something went wrong
- sending your backup to one of the famous cloud storage services (like Dropbox, Google Drive, Amazon S3, etc.)
- archive encryption
- file backup
- support of SQL Server, My SQL, and Azure databases
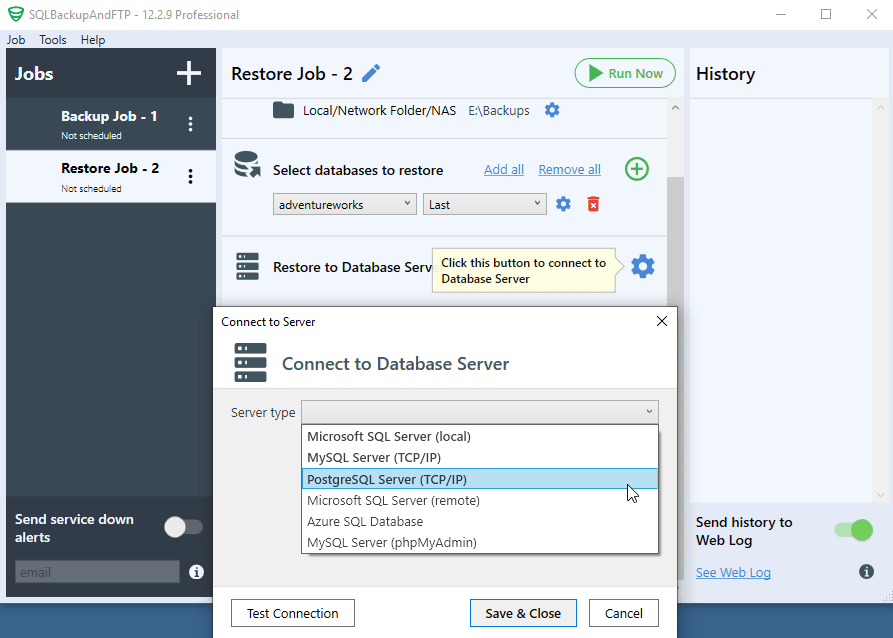
It’s quite easy to start with SQLBackupAndFTP. After downloading and installation, connect it to your PostgreSQL database by pressing the “Gear” button at the “Connect to Database Server” section. In the popup that appears, choose PostgreSQL (TCP/IP) as a server type, then specify the login/password. After that, click “Test Connection” to check if everything is ok and press “Save & Close” to apply all the settings:

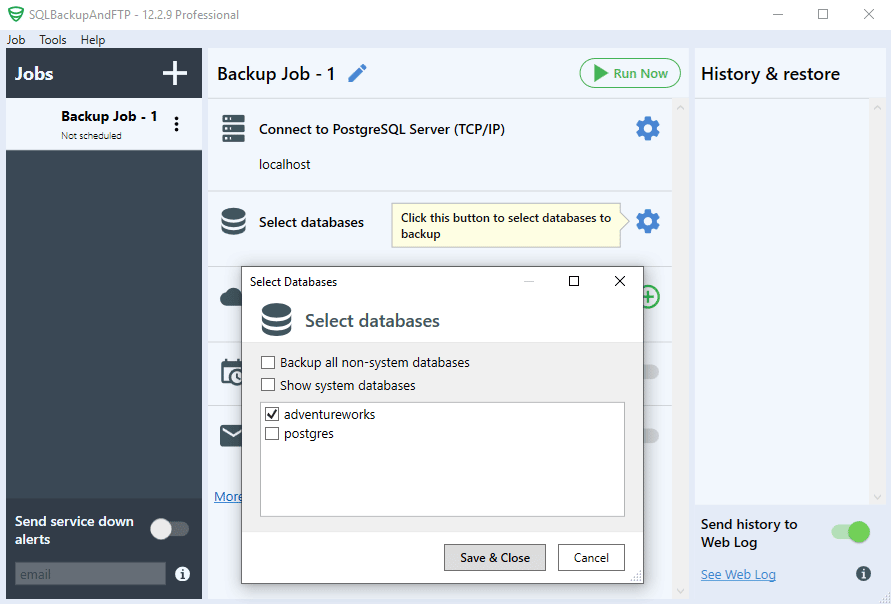
Then you need to select databases that you want to backup, by clicking a gear under “Select Databases” section:
After that, choose a destination where PostgreSQL database backups will be sent to by clicking the “plus” icon in the “Store backups in selected destinations” section.
You can send the backup to the following cloud storage services: Local or Network folder, FTP Server, Amazon S3, Dropbox, Google Drive, OneDrive, Box, Azure Storage, OneDrive, for Business, Backblaze B2, Yandex Disk: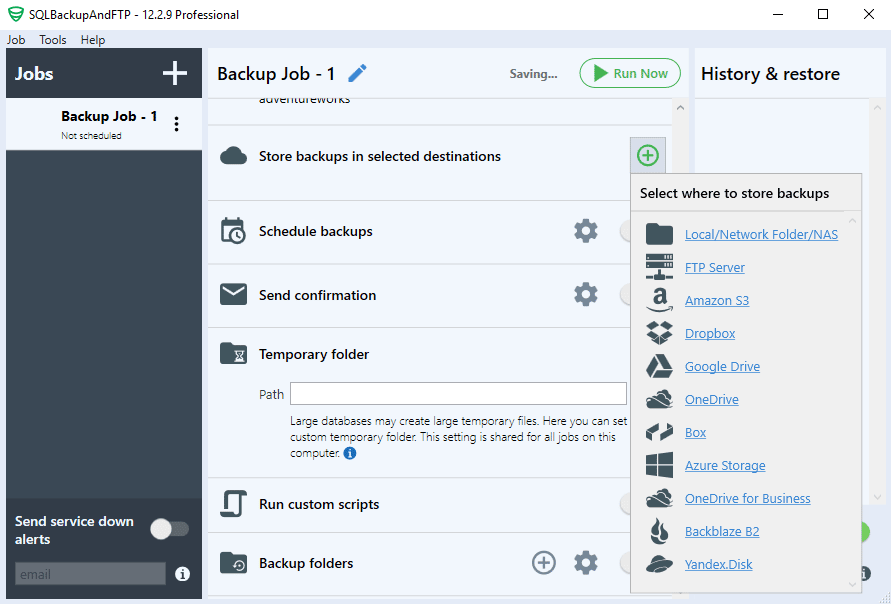
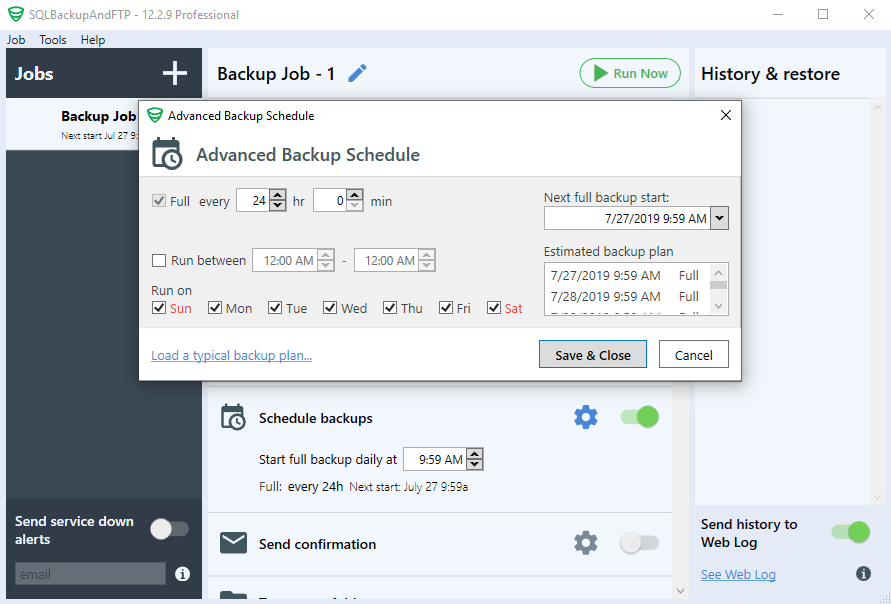
If you want to run the backup to a schedule you need to set up a backup plan. You can get it done in the following way: turn on the switch next to “Schedule backups” title and click on the “Gear” button to access the advanced backup schedule settings:
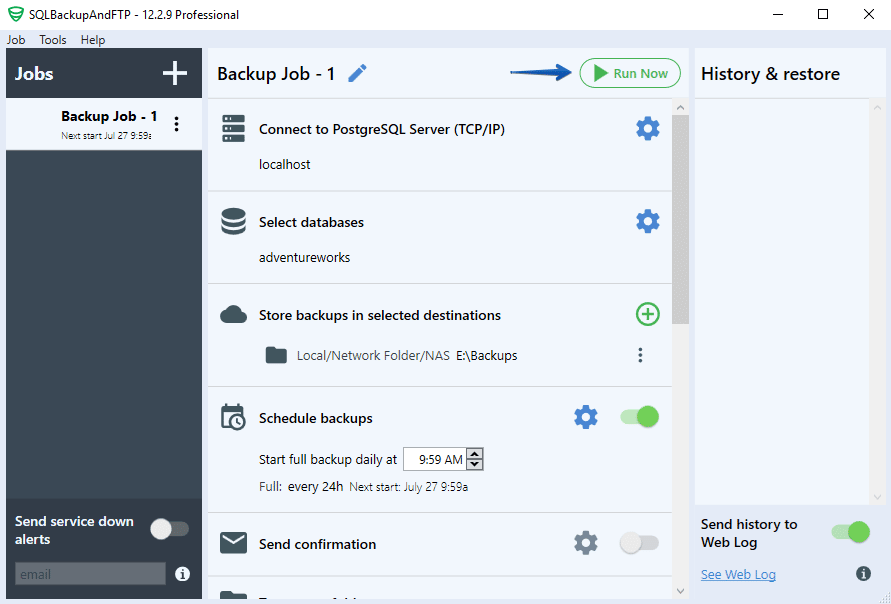
This is all. If you need to create the backup right away click “Run Now”:
Optionally, if you need to apply some pg_dump options, you can scroll down, click “More settings…” and then “More settings…” again in the “Backup options” section. This will give you the following window with several quick options and the ability to add your own: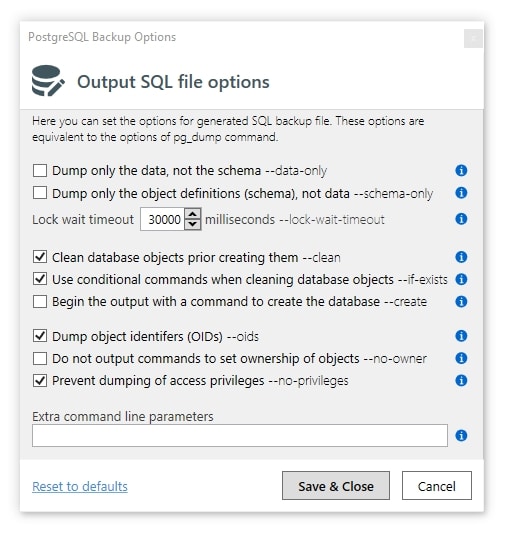
How to restore the PostgreSQL database using SQLBackupAndFTP
There are two ways to restore previously created backup using SQLBackupAndFTP:
- From the “History & restore” pane if the backup was created by means of SQLBackupAndFTP
- Using a “Restore Job” if the backup was created by other means, most probably by pg_dump utility directly
In the first case, you need to find the backup you want to restore in the “History & restore” section of the main window, click the three dots icon and select “Restore from backup”: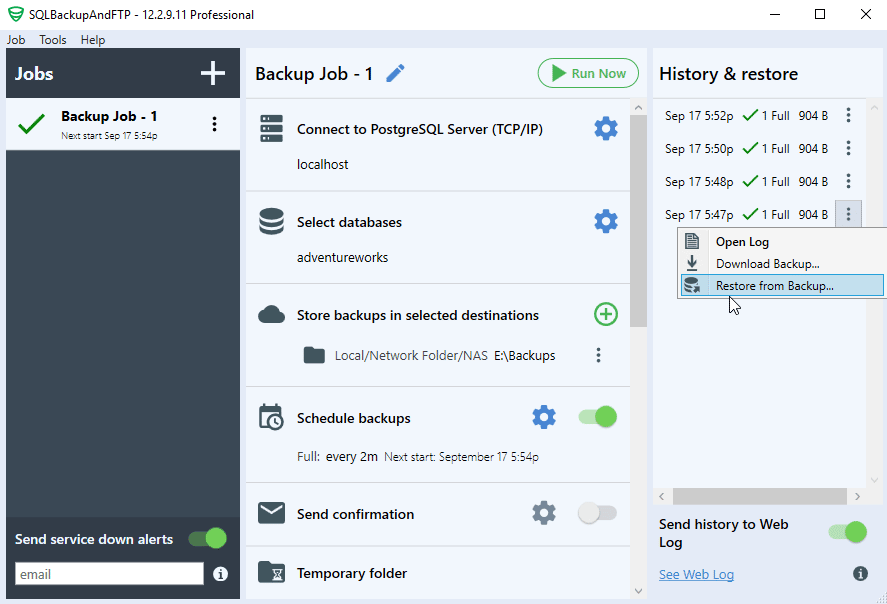 You will see a popup where you need to choose what database from what destination you want to restore, the following screenshot has only one option:
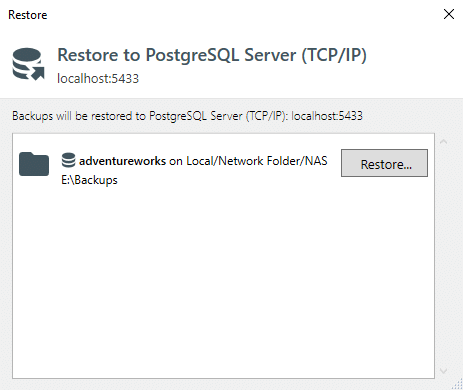 On the last step, you will have a possibility to change database name (if you don’t want to overwrite the existing database) and specify the archive password (if you set one up when created the archive):
How to restore an arbitrary SQL dump using SQLBackupAndFTP
If you’ve got an arbitrary PostgreSQL dump of database backup that you want to restore on this machine then you can take advantage of “Restore Job” available in SQLBackupAndFTP. This job takes SQL dump from the cloud storage and restores it on the selected database. The procedure of setting such job up is similar to creating backups.
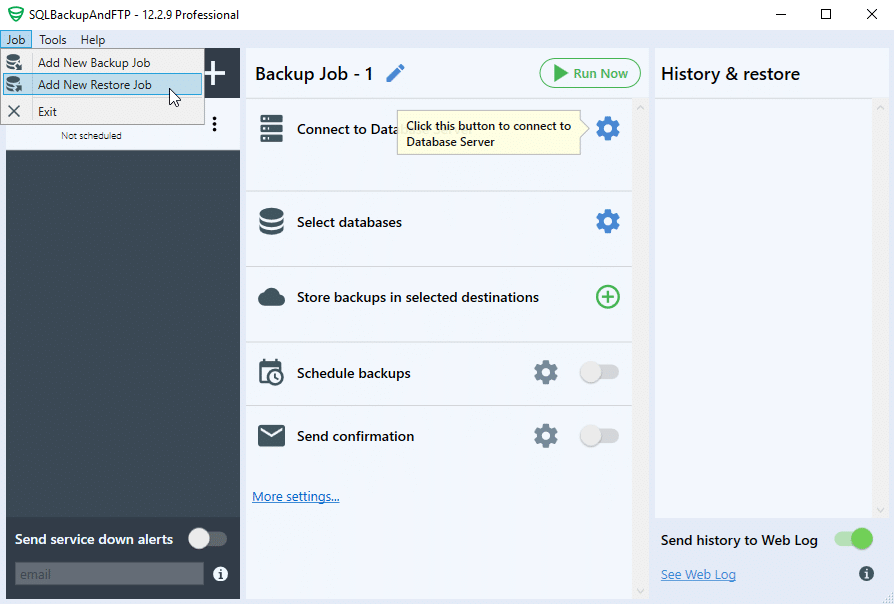
Create a “Restore job” by clicking “Job” > “Add New Restore Job”:
Choose a place where your backup is located:

In the “Store databases to restore” section choose a backup that should be restored:
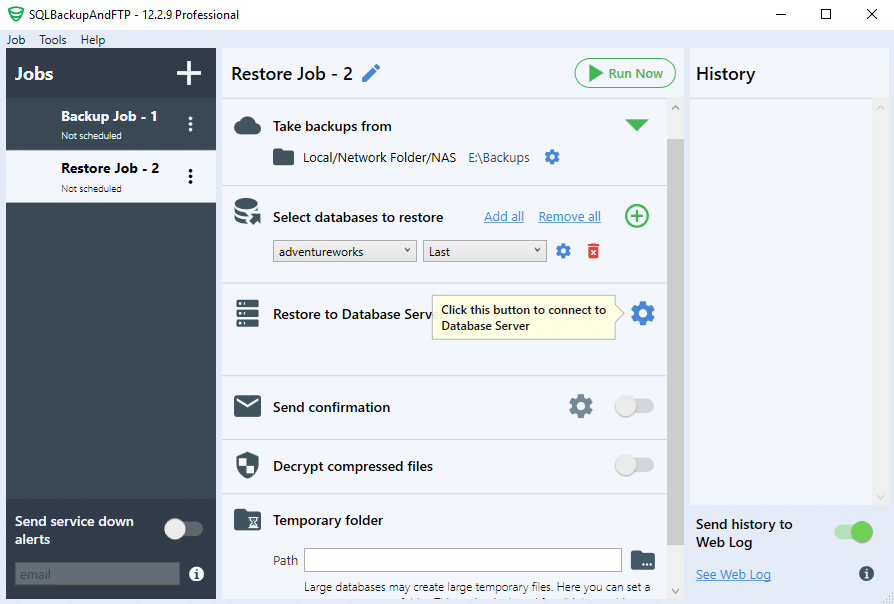
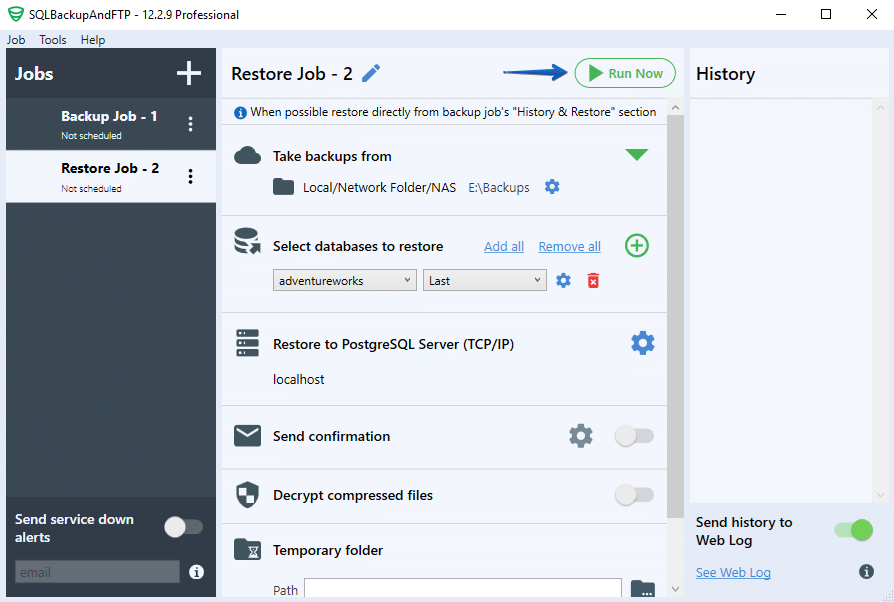
Connect to your PostgreSQL server in the “Restore to Database Server” section:
Now as all the preparation is done, restore your backup by clicking the “Run Now” button:
4 thoughts on “How to Backup and Restore PostgreSQL Database on Windows”
This statement “psql database_name < database.sql" will not run in PowerShell CLI because it doesn't accept the "<" operator. It says it's reserved. What is the work around?
Hi,
You can try the following statement cmd.exe /c “psql database_name
Is there a GUI option to use pg_restore parameters?
Hi Dmitry,
Sorry, but for now there is no way to do it, perhaps that option will be added later. Could you please let us know what parameters you would like to set during the restoration process?