
The fact is that hosting your website on a shared hosting most probably means that the only way to access your MySQL database would be through phpMyAdmin. Moreover, regular backups are still the most efficient way to protect your data, and making this process automatic with phpMyAdmin will make this routine much easier.
The good news is that SQLBackupAndFTP allows its users to backup their MySQL Server databases by connecting not only directly via TCP/IP, but also via the web interface of phpMyAdmin. Now, this process allows it to work for practically every website, including with the cheapest shared hosting.
Creating Regular Backups via phpMyAdmin
Being one of the most used applications for MySQL databases management, PhpMyAdmin allows its users to create, alter, delete, drop, export, and import MySQL database tables. In addition, through this handy application, you can run MySQL queries, repair, check and optimize tables, change collation as well as execute other database management commands. The great news is that this app is totally free.
How to Backup MySQL Database Using phpMyAdmin
Creating a database backup with phpMyAdmin is very easy and takes only a few simple clicks. Here’s a step-by-step guide to backup your database:
1. Select the database you want to back up from the list in the left pane

2. Click the “Export” tab in the top navigation bar

3. Select the “Quick” export method and then click “Go”

4. The database will be downloaded to the local computer’s default downloads location
That is it. Your database has just been backed up. The only thing is that the above phpMyAdmin process contains no specific settings to make database backups regularly and automatically. This is precisely where SQLBackupAndFTP comes into the game.
How to Backup via phpMyAdmin Using SQLBackupAndFTP
SQLBackupAndFTP allows you to create a task that will make backups in accordance with a specific schedule and then forward them to the selected location. Here’s a step-by-step guide to automate your backups:
1. Download and install SQLBackupAndFTP. After that connect it to your MySQL Server using the phpMyAdmin method
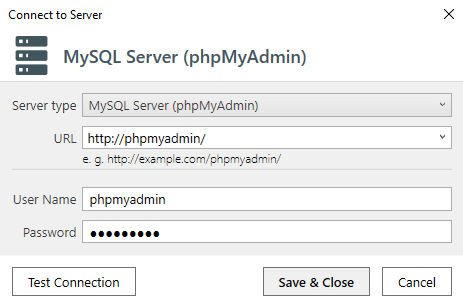
When prompted, enter your ordinary username and password that you usually use to access phpMyAdmin. Click the “Test Connection” button to make sure that everything works just fine.
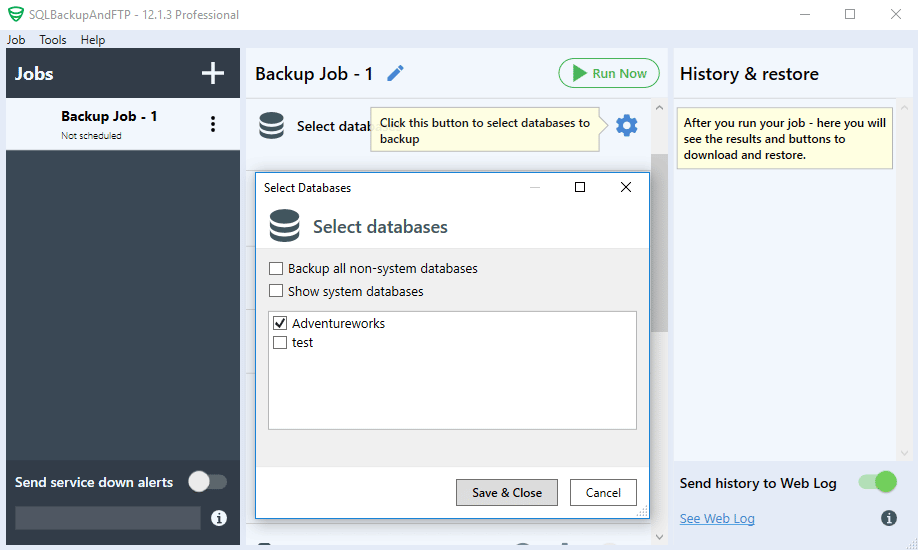
2. After connecting to MySQL Server select databases that you need to backup, to do it click on the “Gear” button and choose databases from the list
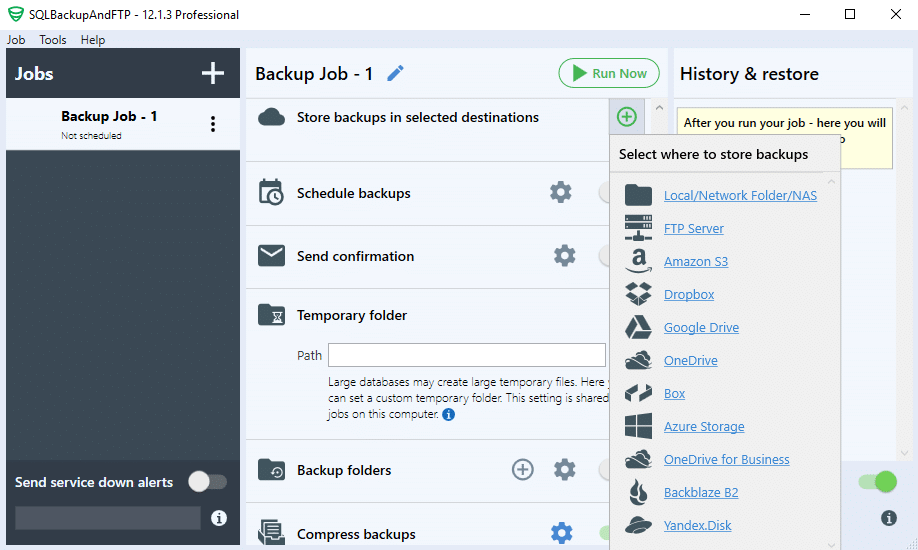
3. After that, choose one or more locations where your MySQL Server database backups will be sent and stored by clicking on the “plus” button
4. To make this process automatic, turn on “Schedule backups” and “Advanced Backup Schedule” to set up a backup schedule
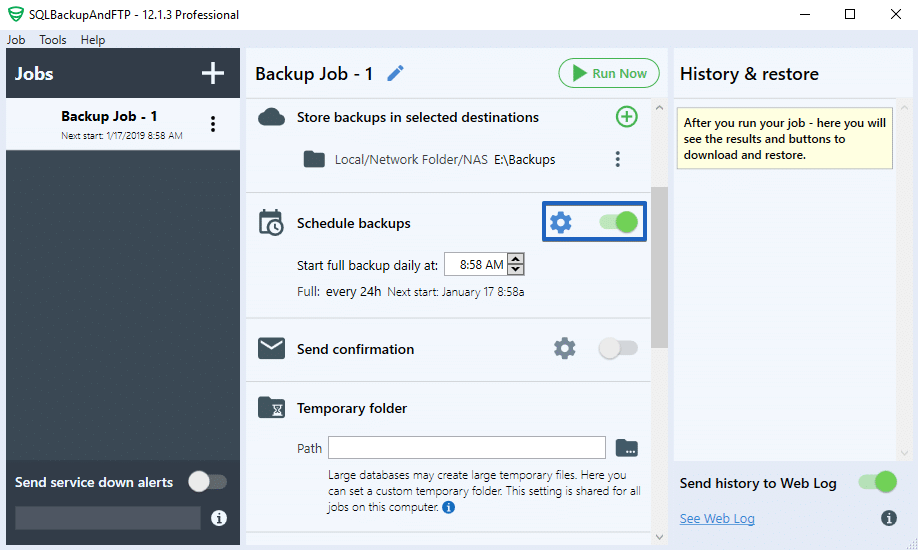
Now all basic backup job settings are done and they are saved automatically.
Test your backups from time to time
Another critical moment in the backup strategy is to check or test backups regularly. Creating a backup of all your recent database changes does not necessarily mean ensuring 100% safety of your data. That is why we recommend practicing restoring your database on another (test) server from time to time. This procedure will allow you to have a reliable database backup in the event of failure as well as ensure a fast restoration process.
4 thoughts on “How to Automatically Backup phpMyAdmin”
Thank you very much, it’s working 100%
How can i use this on a Localhost Xampp Database? The URL: http://localhost/phpmyadmin/ or http://phpmyadmin/ doesn’t work :/
Can someone help me?
Hi,
Please find the reply at http://community.sqlbackupandftp.com/t/database-connection-doesnt-work
plz select your Database and then copy url