Even though Azure SQL Database provides built-in backup, you may still want to create a local copy of your Azure SQL database. This could be handy for example when you want to keep database backup copy for free longer than allowed by Microsoft Azure built-in tools which are usually 7 to 35 days, depending on your service tier. Here we will explain in detail how to backup Azure SQL Database to a Local Machine.
There are several ways to download the Azure database to your computer. The table below summarizes several key methods with pros, cons, and usage scenarios. Click the name for more details about each method.
-
- Simple process
- Works even with old SQL Server / SSMS
- Can export data into different file formats
- Only data is imported, all other objects will be lost
- Requires SQL Server Management Studio
- Manual procedure
Use if you need to move data from Azure to a specific destination (e.g. your old SQL Server) or in a particular format (e.g. flat file) with SQL Server Management Studio tools -
- Can export data into different file formats
- Can be run unattended/automatically
- Only data is imported, all other objects will be lost
Similar to SQL Server Import and Export Wizard, but enables automatic process -
- Creates the most exact copy of the database
- Simple user interface
- Requires the latest DAC library installed
- Creates a specific BACPAC file
- Manual procedure
Use when you need to create a BACPAC file with SQL Server Management Studio tools -
- Creates the most exact copy of the database
- Can be run unattended/automatically
- Requires the latest DAC library installed
- Creates a specific BACPAC file
Use if you need to create a BACPAC file from a command line -
- Can export data into different file formats
- Can be run unattended/automatically
- Only data is imported, all other objects will be lost
- Imports only one table at a time
Use if you need to save data from one or several tables in a readable format -
- Simple UI
- Can create scheduled backups
- Doesn’t require a DAC library installed
- Creates a specific BACPAC file
Use when you need to perform automatic backups into BACPAC file regularly -
- Everything online, no software installation required
- Creates a specific BACPAC file
- The Azure storage account is required
Suitable if you only have a browser
Azure SQL Database Firewall Setup
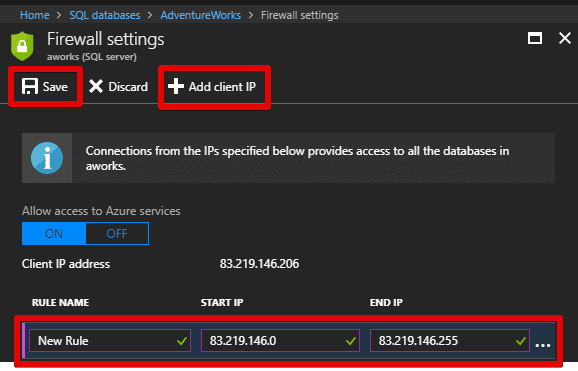
Since we are going to connect to Azure SQL Database from outside, we need to set up a built-in firewall accordingly by adding the IP address of the machine to which we want to download our database copy.
For that go to Azure Portal, select “SQL databases” > Your database > “Set server firewall”:
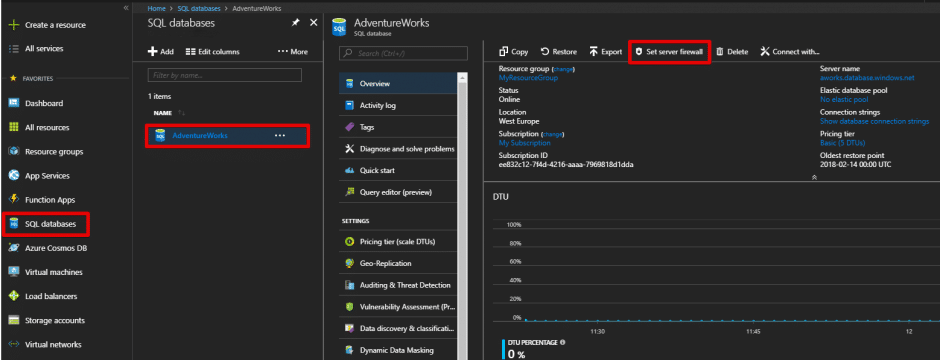
Then, add the new rule, and don’t forget to click “Save”. For convenience, you can click on “Add client IP” and the rule for the current IP address will be generated automatically:
Create a snapshot for export
If you have a lot of write operations, then it is recommended to create a copy of the database before exporting. This will ensure the transactional consistency of the exported data. The easiest way to do this is by executing an SQL Command:
CREATE DATABASE AdventureWorksCopy AS COPY OF AdventureWorks
More information about copying a database can be found here.
How to Backup Azure SQL Database Using SQL Server Import and Export Wizard
Using built-in SSMS SQL Server Import and Export Wizard you can convert data between any sources, including ODBC, OLE DB, MS Access, MS Excel, and even flat file. This is exactly what we will use to copy data from Azure SQL Database to a local computer.
For starters, open SQL Server Management Studio and connect to your Azure SQL Database. If upon connecting you see the following message:
Cannot open server ‘azure_server_name’ requested by the login. Client with IP address ‘83.219.146.206’ is not allowed to access the server. To enable access, use the Windows Azure Management Portal or run sp_set_firewall_rule on the master database to create a firewall rule for this IP address or address range. It may take up to five minutes for this change to take effect.
then you need to add your IP address to Azure Firewall.
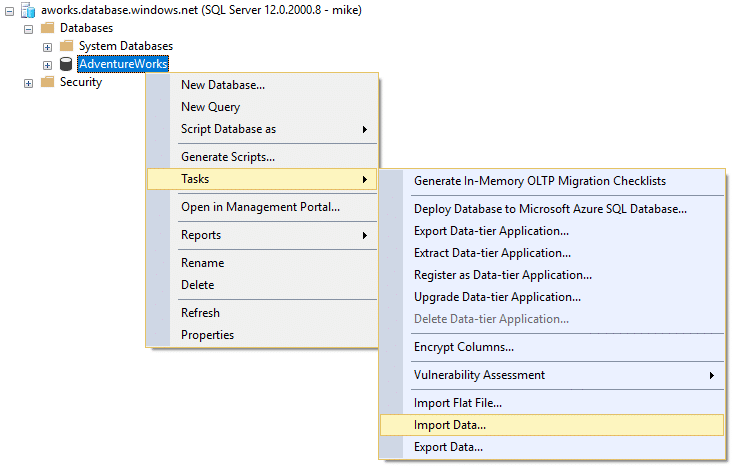
Following a successful connection, select the database you need (in this case its AdventureWorks), right-click of the mouse and select “Tasks” > “Import Data” (or “Export Data”):
This will prompt SQL Server Import and Export Wizard where you need to select “.Net Framework Data Provider for SqlServer” as a source and then enter the details of your Azure databasе:
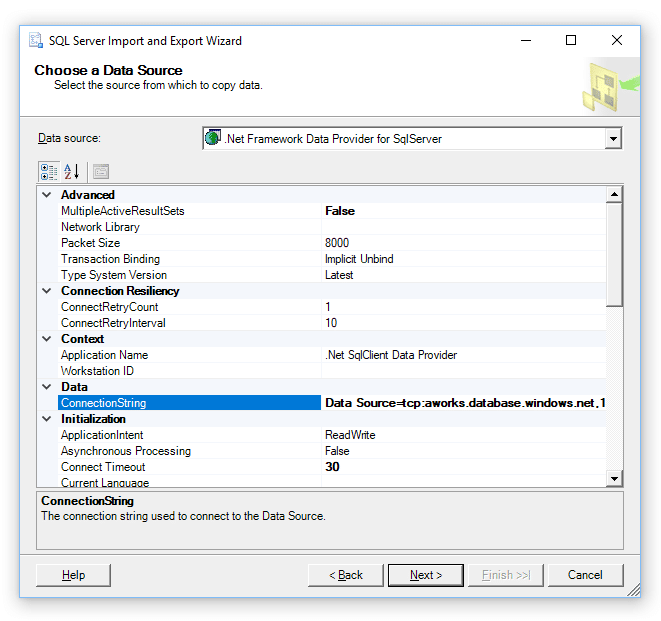
The easiest way of doing that is to enter a ConnectionString which you can obtain on Azure Portal:
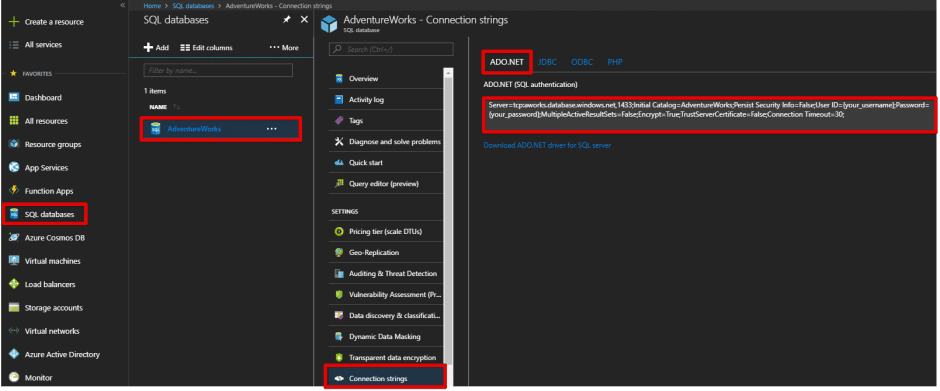
Don’t forget to change {your_username} and {your_password} in connection string into real values.
Clicking the “Next” button will trigger connection testing. If everything goes well you will be asked for the Destination parameters. From the drop-down list you will be able select not only SQL Server, but Excel, Access, and even Flat File as well:
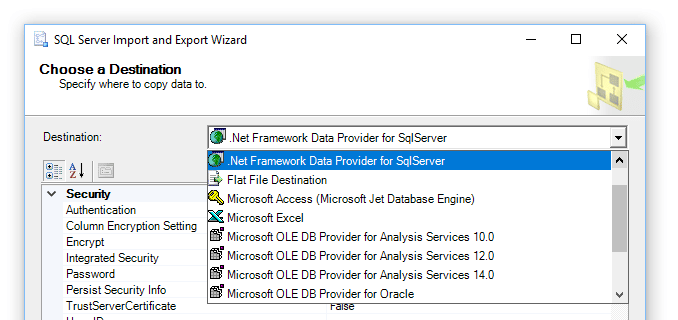
If you want to export data to SQL Server, you can obtain a Connection String using the following query:
select
   'data source=' + @@servername +
   ';initial catalog=' + db_name() +
   case type_desc
       when 'WINDOWS_LOGIN'
           then ';trusted_connection=true'
       else
           ';user id=' + suser_name()
   end
from sys.server_principals
where name = suser_name()
Following a successful connection to the destination, you will be prompted to select export of all data or only the result of a specific query. Selecting all data will require you to select tables for export. Selecting only query data will ask you to enter the query text.
The last step will run the export. A successful export screen will look similar to the one below:
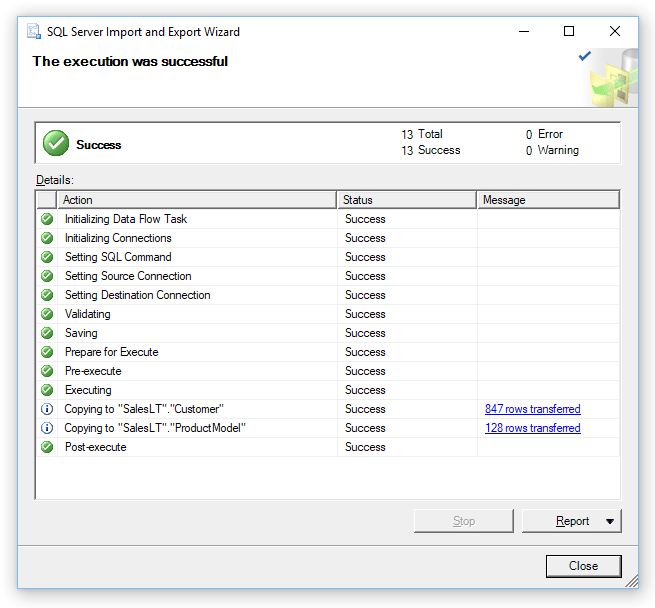
It should be noted that during one of the interim steps you will be prompted to save the export as SSIS Package. This will enable export with SSIS tools, which are reviewed in the next section.
How to Backup Azure SQL Database Using SQL Server Integration Services (SSIS)
SQL Server Integration Services is a powerful platform that allows to integration and transforms data between various applications. We have already faced it in the previous section when we exported Azure Database with SQL Server Import and Export Wizard.
SSIS allows running such export automatically (e.g. from a command line) if you have a .dtsx file (SSIS Package) that contains all the necessary information about the export procedure. You can create such file with SSMS (as described above), and then run it either with DTEXEC.EXE command-line utility, or with DTEXECUI application, or with SQL Server Agent Job.
For example, if you saved export parameters into AzureExport.dtsx, you can run it again by using the following command:
DTEXEC.EXE /F "AzureExport.dtsx"
If you prefer a graphical interface, you can use The Execute Package Utility (DTEXECUI) app, although it requires Management Tools – Basic or Business Intelligence Studio to be installed by the SQL Server.
How to Export Azure SQL Database to BACPAC File
SQL Server Management Studio includes a simple option to export your Azure SQL Database into a .bacpac file. In this tutorial, we will show how to do it using SSMS.
Requirements
- You will need SSMS Installed
- Make sure that the firewall rule is enabled in the Azure SQL Server
- An Azure SQL Database installed
- Internet Connection
You will first need to connect to your Azure SQL Database using SSMS.
Once you are in SSMS right click on your Azure SQL database and select Task and Export Data-tier Application:
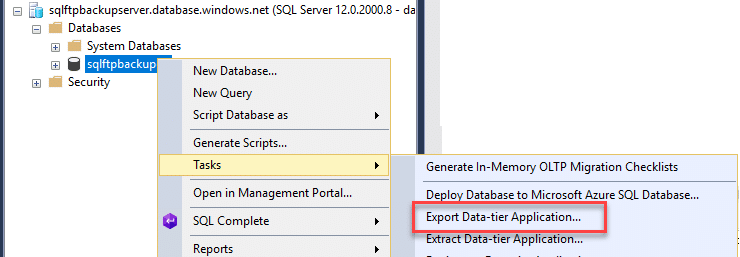
This option will open a Wizard. In the first part, it will show an introduction. In the introduction, press Next.
In the Export Settings section go to Save to local disk and specify a local path in your machine to install the bacpac file.
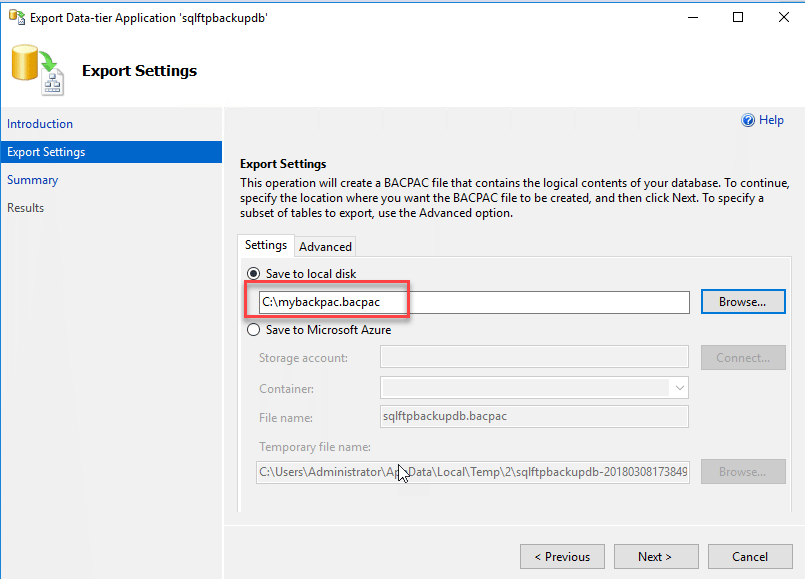
The wizard will go to Summary to show all the settings configured. Press next in that section.
Eventually, if everything is OK will show a green status. The exporting process includes exporting data, schemas, tables, references, and all other database components. Once you receive the message, you can verify the bacpac of the file exported and used to recover the database to another SQL Server.
How to Backup Azure SQL Database Using SqlPackage Utility
The SqPackage Utility allows to import or export of data using the command line. It can be very useful if we need to automate and program import and export tasks. This software is usually installed with SSMS or SSDT. To search it you can use in the cmd with the following commands (make sure to run the cd\ first):
dir sqlpackage.exe /s /p
The command will show the path of sqlpackage utility. The path is usually similar to this one:
C:\Program Files\Microsoft SQL Server\150\DAC\bin
The syntax for the SqlPackage to export is the following:
sqlpackage.exe /Action:Export /ssn:tcp:<ServerName>.database.windows.net,1433 /sdn:<DatabaseName> /su:<UserName> /sp:<Password> /tf:<TargetFile> /p:Storage=File
Let’s run a simple example:
sqlpackage.exe /Action:Export /ssn:tcp:sqlftpbackupserver.database.windows.net /sdn:sqlftpbackupdb /su:daniel /tf:c:\sql\sqlftpbackup.bacpac /sp:yourpwd /p:Storage=File
We are exporting a file (Export) to an Azure SQL Server named sqlftpbackupserver.database.windows.net and the source database name is sqlftpbackup. The source user is daniel and the target file where we will export is in the c:\sql\sqlftpbackup.bacpac sp is to specify the Azure SQL database password of the Azure SQL user. Finally, we will store it in a file.
Common errors
A typical error is this one:
*** Error exporting database: Could not connect to database server.
Cannot open server ‘sqlftpbackupserver’ requested by the login. Client with IP address ‘181.114.103.171’ is not allowed to access the server. To enable access, use the Windows Azure Management Portal or run sp_set_firewall_rule on the master database to create a firewall rule for this IP address or address range. It may take up to five minutes for this change to take effect.
If this is your error, set the firewall. We already wrote how to do it at the beginning of this article.
Another typical error is this one:
*** Error exporting database: The database compatibility level ’12’ is not within the supported range of 80 to 130.
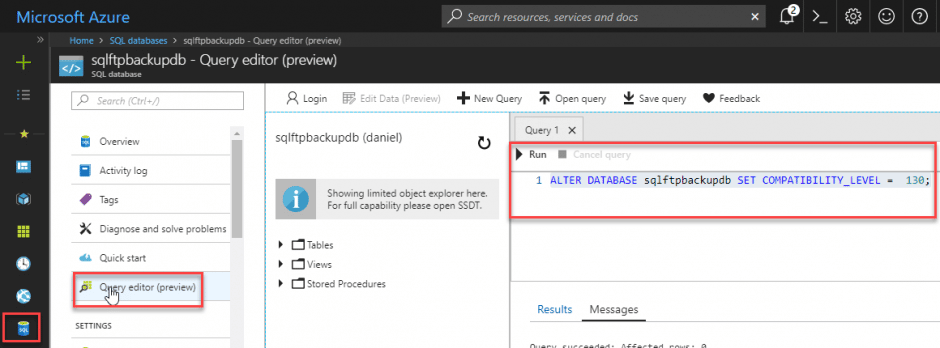
This is a problem with Azure. The level in SQL Server on premisses is between 80 and 130, however in Azure SQL, hte level is 12. To do this we will need to run the following T-SQL in Azure. You can use SSMS, but I prefer to use the Query Editor in the Portal because you do not need to install anything:
ALTER DATABASE sqlftpbackupdb SET COMPATIBILITY_LEVEL = 130;
How to Backup Azure SQL Database Using BCP Utility
In this example, we will have a table named xxx and we want to export it to a file using the bcp utility (bulk copy program). In the command line check if you have the BCP utility. If you do not have it, you will receive the following message:
bcp is not recognized as an external/internal command or operable program or batch file
If you receive this message, you can download the bcp utility here. Once installed, in the command line write this:
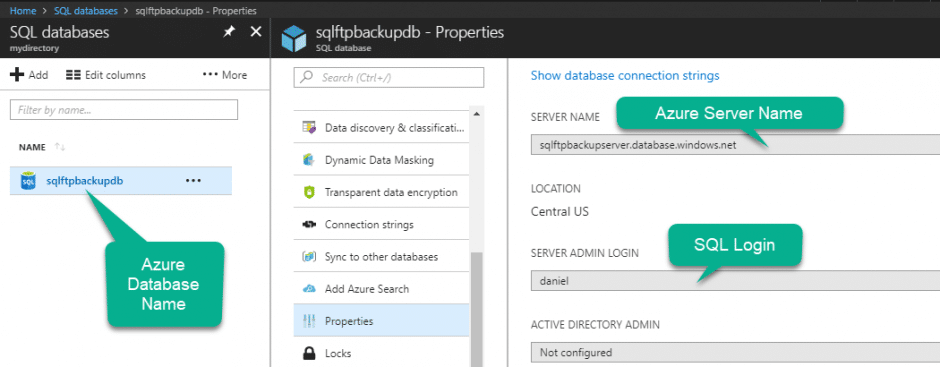
bcp sqlftpbackupdb.SalesLT.CustomerAddress out c:\sqlfile\cust.dat -c -U daniel -S tcp:sqlftpbackupserver.database.windows.net
Sqlftpbackupdb is the database name. SalesLT is the schema and CustomerAddress is the table to export. We will export the table to a local file in the c: drive in the sqlfile folder and the name of the file will be cust.dat. -c is used to convert to char data type. -U is used to specify the user name and -S the Azure Server name.
The command line will ask for a password. Write the password.
A typical error message here is:
SQLState = 37000, NativeError = 40615
Error = [Microsoft][ODBC Driver 13 for SQL Server][SQL Server] Cannot open server ‘sqlftpbackupserver’ requested by the login. Client with IP address ‘181.114.102.51’ is not allowed to access the server. To enable access, use the Windows Azure Management Portal or run sp_set_firewall_rule on the master database to create a firewall rule for this IP address or address range. It may take up to five minutes for this change to take effect.
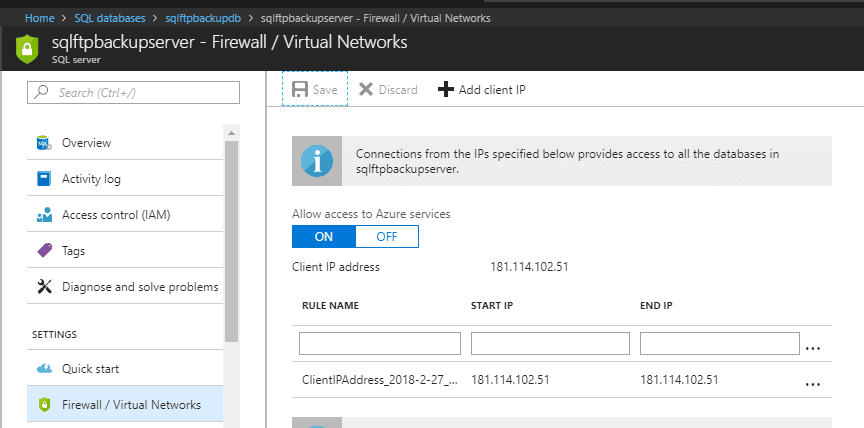
To solve this error, go to the Azure Portal and go to Firewall/Virtual Networks:
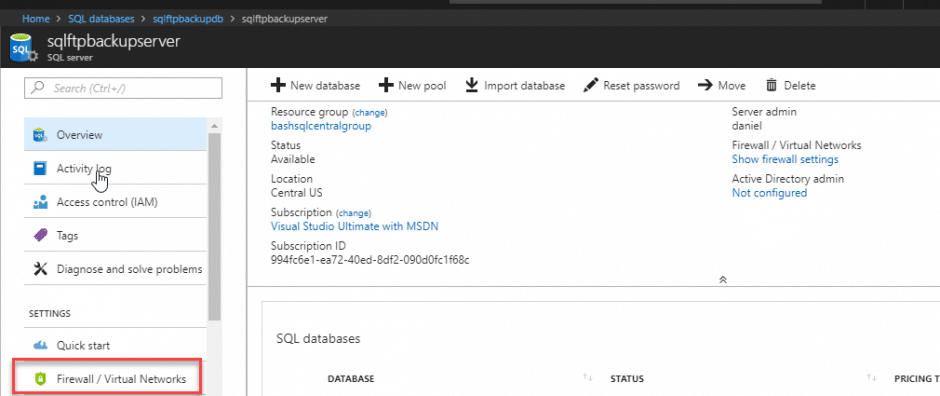
In Firewall/Virtual Networks press + Add client IP and press Save:
If everything is OK, you will be able to copy the files and it will show the number of rows copied:

Some tips:
- If there are millions of rows, you will need to specify the batch size. You can use the -b to specify the number of rows per batch.
- Make sure that the account in the command line has access to write data in the local folder specified.
- Also, the internet connection is important. If you do not have a good internet connection, the bcp operation may fail.
- To increase the performance, the hint TABLOCK may be useful (-h tablock) this hint locks the table during the bcp operations to improve the bcp performance.
- By default, the triggers are not fired in these operations.
How to Backup Azure SQL Database Using SQLBackupAndFTP
SQLBackupAndFTP is an extremely powerful tool to backup SQL databases to Azure, Dropbox, FTP a local file, Amazon S3, Box, Google Drive, and other options. In this example, we will backup an Azure SQL database in a local file named sqlftpbackupdb201803082133.zip.
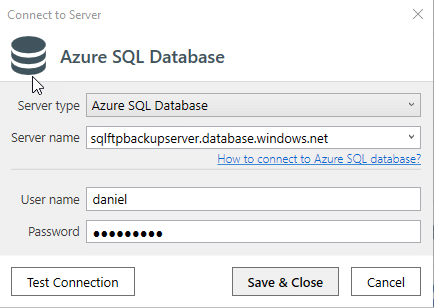
You will first need to download and install SQLBackupAndFTP. The application will ask the Server type. In this example, it is Azure SQL Database. It will ask for the Azure SQL Server name, a user name, and a password. This information is set when you create the Azure SQL Server.
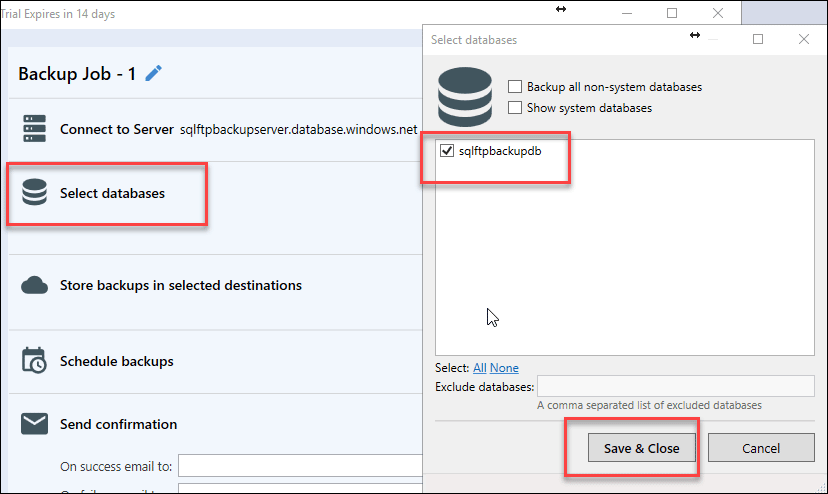
The next step will be to select the database. In this example, the Azure SQL Database name is sqlftpbackupdb. Press Select databases and check the database. You can also see system databases (the master database in Azure SQL):
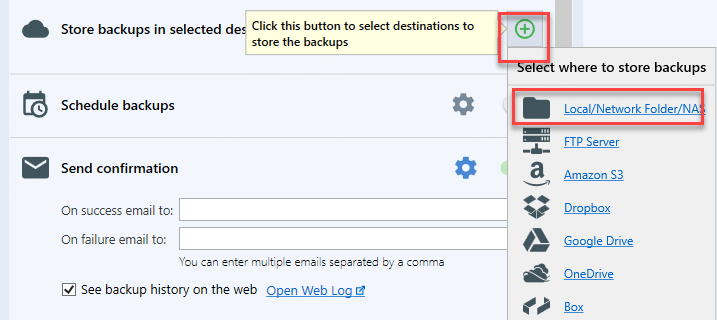
In the “Store backups” section select destination, you can store in a local folder, a network folder, NAS, an FTP Server, Amazon S3, Dropbox, Google Drive, Onedrive, Box, and many other options. In this example, we will store the backup locally.
The last step would be to Run the job. You can Run immediately with the “Run Now” option or you can schedule the backup. You can also receive emails if the backup succeeds or if it fails. This is extremely useful if the backup process takes a long time because you don’t need to wait until it’s done as you will be notified in case of success or failure. It is not necessary to install SMTP server or something extra to send these emails.
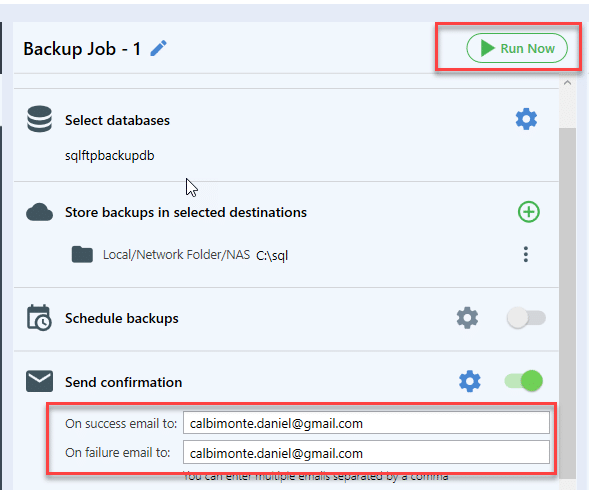
If everything goes OK, a zip file with the backup will be created.
How to Export Azure SQL Database from Azure Portal
You can save your Azure SQL Database in a BACPAC file, which is intrinsically a ZIP file containing the metadata and data from it. You can download the BACPAC file locally and later import it back to Azure or to a SQL Server on-premises installation. However, keep in mind that in order to guarantee transaction consistency a copy of your Azure Database will be created during the export process. This copy is treated as a second database and is billed as such. So, if your database is quite big it might take significant time and money to export it locally.
Let’s create an Azure Storage Account first. A Storage Account is a place in the cloud where you can store files, blobs, queues. It is redundant and secure. In order to create it, enter the Azure Portal, go to the search and write Storage and go to Storage accounts (classic). Note that you can only create bacpac in classic storage accounts:
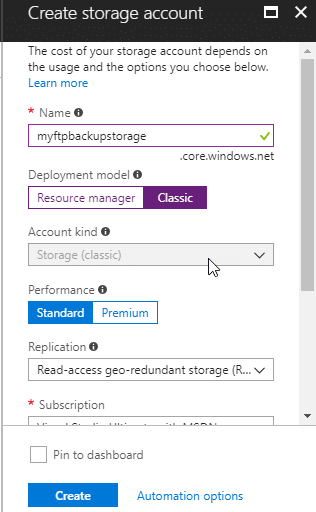
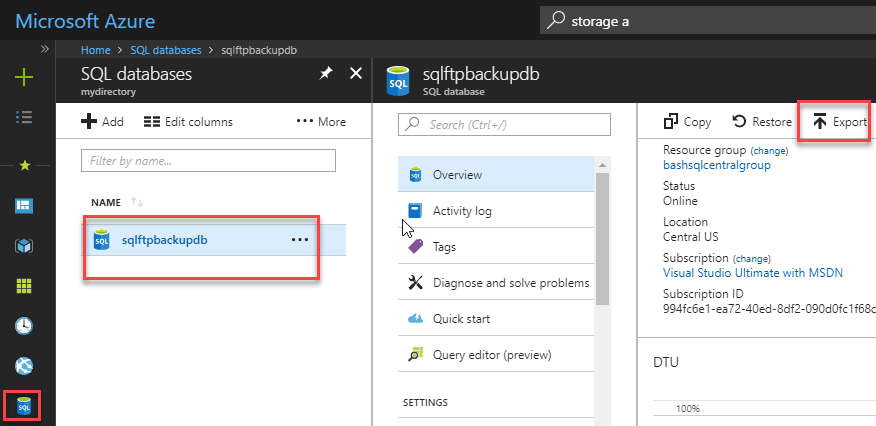
It is now time to export the database backup to the Azure Storage account just created. Select your Azure database and then select export:
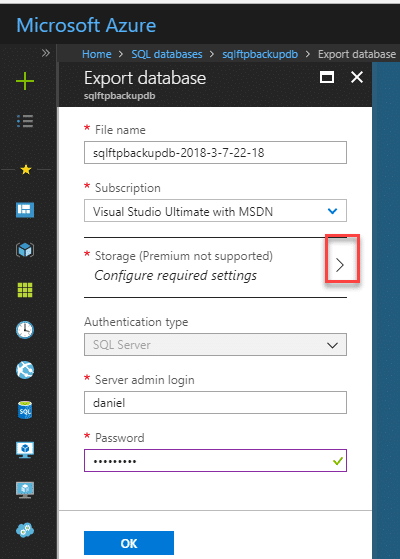
Specify a file name, make sure that the subscription is OK. Configure the login and password. In Configure Required settings, press the button to configure it:
Select the Classic Azure Storage account created before and press + to create a new container. Specify a name for the container and save the bacpac file in that container:
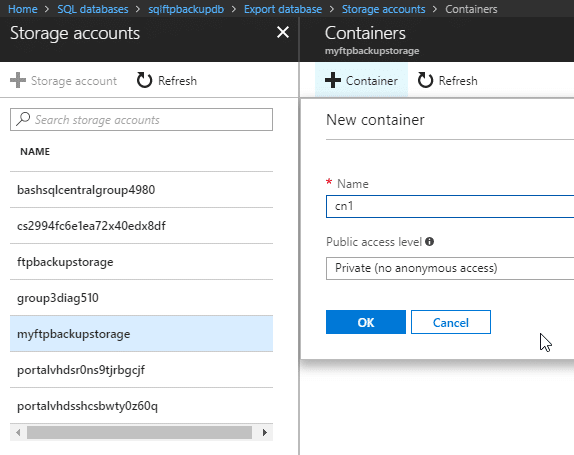
If you need to check the bacpac, click on the container just created:
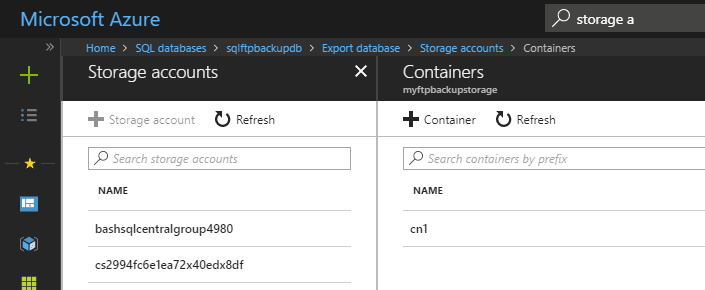
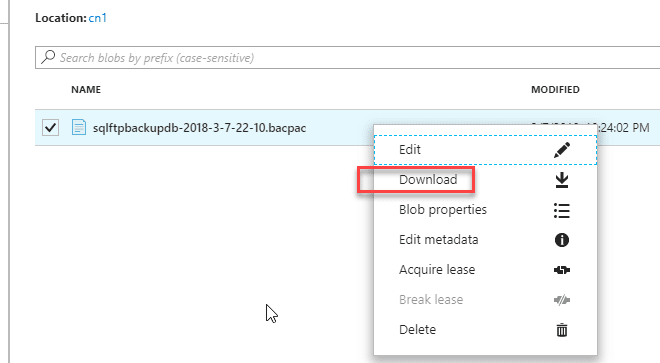
In the container, you will be able to see the file. Right-click and press Download to have on your local machine:
References
https://docs.microsoft.com/en-us/azure/sql-database/sql-database-export
https://azure.microsoft.com/en-us/blog/azure-sql-database-built-in-backups-vs-importexport-2/


15 thoughts on “How to backup Azure SQL Database to Local Machine”
Really Great article. Thanks!
Can you please add the cost for each method or if any of the described methods are free of cost then kindly mark it as a free method?
Hi Ahmad,
Thank you!
The prices can be changed at any time. A destination vendor’s prices can be found at their official web page, SQLBackupAndFTP’ prices at https://sqlbackupandftp.com/features
Is it possible to create an Azure SQL snapshot like in Amazon RDS. https://docs.aws.amazon.com/AmazonRDS/latest/UserGuide/USER_CreateSnapshot.html
Sorry, but no, Azure SQL does not have this option at the moment.
It seems sqlpackage.exe is not installed on the Windows Server initially. I cannot find it using the command: dir sqlpackage.exe /s /p
You can download sqlpackage.exe from the official website https://docs.microsoft.com/en-us/sql/tools/sqlpackage/sqlpackage-download
I tried to make a backup of my database via SSMS, but the file size turned out to be very small. If I import it, only the tables are restored. Why isn’t the data exported?
Most likely you used Extract Data-Tier Application instead of Export Data-Tier Application. Extract Data-Tier Application is intended for transferring data schema only.
I’m testing SQLBackupAndFTP and I like it, especially the database snapshot function for transactionally consistent export. I use an elastic pool, when a copy of the database is created for export. Where is it created in the pool?
Yes, if the source database is in the pool, then a temporary copy of the database will also be created in the same pool. If the source database is not in the pool, then the temporary database will be created in the same pricing tier as the source database.
What is the minimum set of user permissions for export?
For almost all the methods described in the article, it will be enough to give the permissions to VIEW DEFINITION and SELECT.
Is pretty absurd why Microsoft doesn’t provides a simple way of generating a .bak with a FULL backup file.
Is it possible to have incremental backups in any of these solutions?
Hello Amin,
Thank you for your message.
Differential and transaction log backups are available only for local SQL Server. SQLBackupAndFTP also supports incremental backups for MySQL databases. For PostgreSQL, only full backups are available at the moment.
Thank you for the feature request. It has been forwarded to our development team for consideration.